Google Adwords Remarketing Lists lets you send a list of users (audience list) to Google Adwords and run targeted advertising campaigns without having to update the user list manually.
RudderStack supports Google Adwords Remarketing Lists as a destination to which you can send your audience list.
Getting started
Before configuring Google Adwords Remarketing Lists as a destination in RudderStack, verify if the source platform is supported by referring to the table below:
| Connection Mode | Web | Mobile | Server |
|---|---|---|---|
| Device mode | - | - | - |
| Cloud mode | - | - | Supported |
Once you have confirmed that the source platform supports sending events to Google Adwords Remarketing Lists, follow these steps:
- From your RudderStack dashboard, add the source. Then, from the list of destinations, select Google Adwords Remarketing Lists (Customer Match).
- Assign a name to your destination and click Next.
Connection settings
To successfully configure Google Adwords Remarketing Lists as a destination, first authenticate your account by following the below steps:
- Click Create Account in the Account Settings section.
- From the modal, click the Sign in with Google button.
- Choose the required account and grant RudderStack the required permissions.
- Click Save to use the specified account, as shown:

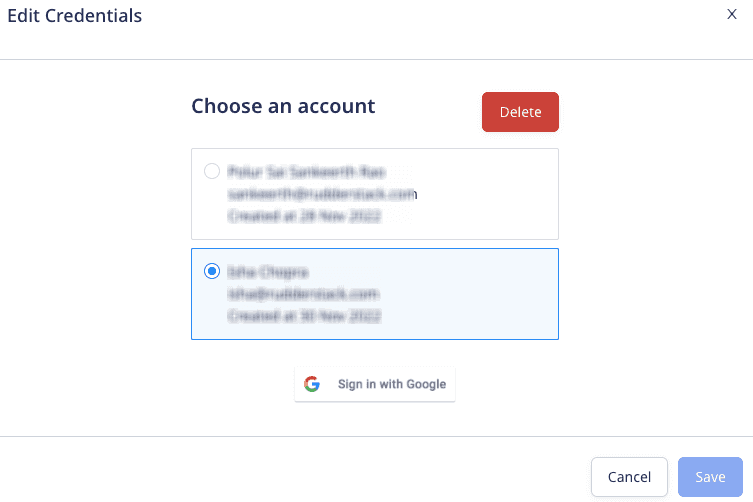
RudderStack gives an error if you try to delete an account used by any other connection set up for the same destination.
Next, configure the following settings:
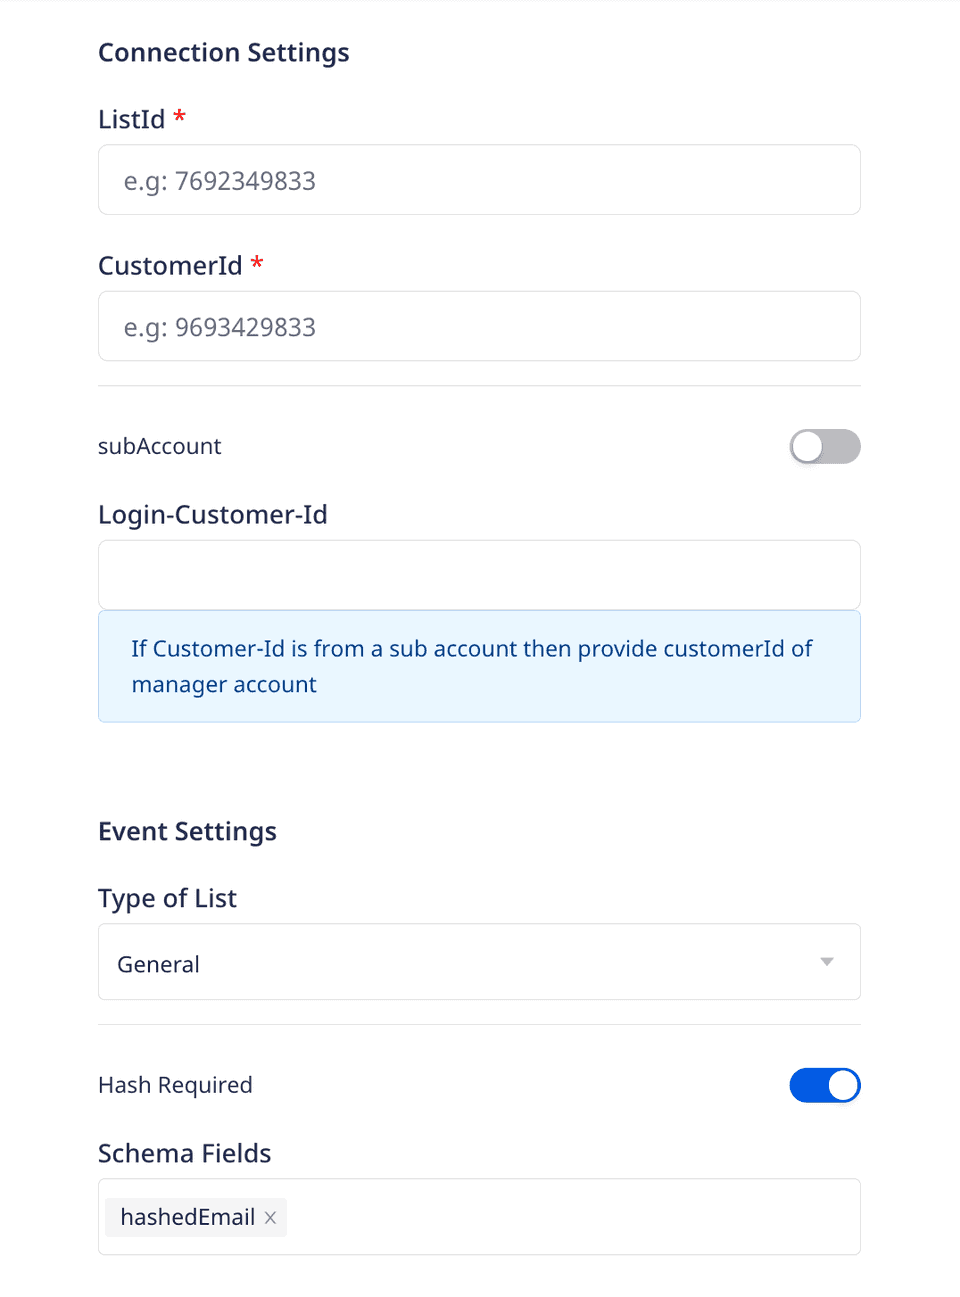
- ListId: To get your Google Ads list ID, go to your Google Ads account and navigate to Tools & settings > Audience Manager.
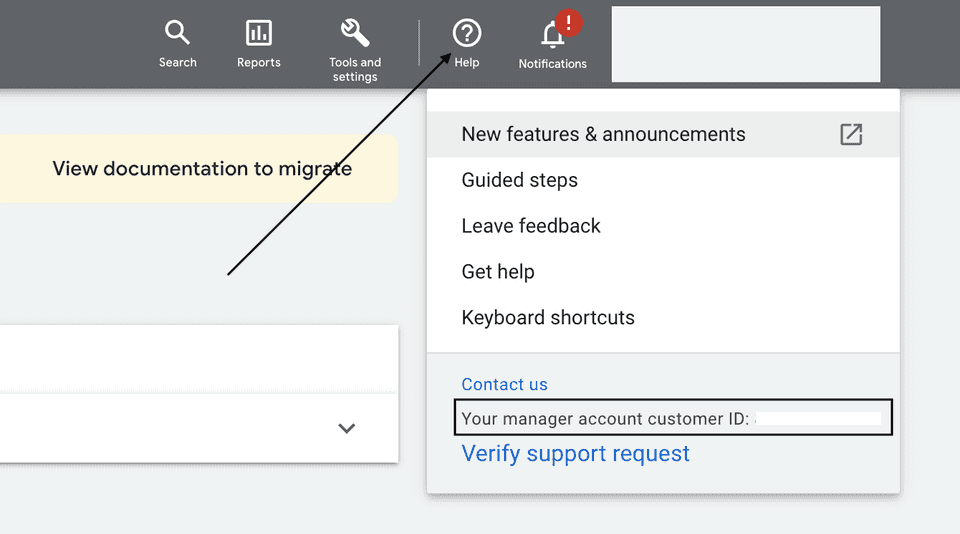
- Customer ID: Enter the ID associated with your Google Ads account. You can find it by clicking on the Help option in your dashboard.
For more information on obtaining the customer ID, refer to the Google Ads Help Center page.
- Subaccount: Enable this setting if you are using a Google Ads subaccount.
For more information on subaccounts, refer to the Google Ads Help Center page.
- Login-customer-ID: Enter the customer ID of the parent account (associated with the subaccount).
This field is required only when you want to send data to a customer list of a subaccount.
- Type of List: Select the type of list you want to create.
You can create three types of list via this setting:
- General: You can send email, phone number, and address information in this list. RudderStack will hash this data and send it to Google Adwords Remarketing Lists depending on the Hash Required setting (enabled by default).
- UserId: You can send third party user IDs in this list.
- Mobile Device ID: You can send mobile device IDs in this list.
- Hash Required: This setting is enabled by default and hashes the
email,phone,firstName, andlastNamefields in the SHA-256 format. - Schema Fields: If you have selected General as the list type, you will need to choose your schema fields (at least one) from the available options. The options are
hashedEmail,hashedPhoneNumber, andaddressInfo.
RudderStack expects the user events to consist of all the schema fields listed here.
audiencelist event structure
The Google Adwords Remarketing Lists destination supports only audiencelist calls. You can send up to 100000 user records in one call.
RudderStack supports both additions and deletions to a user list.
The following code snippet shows a sample audienceList call:
{ "userId": "user1", "anonymousId": "anon-id-new", "event": "event1", "type": "audiencelist", "properties": { "listData": { "add": [{ "email": "alex@example.com", "phone": "1234567890", "firstName": "Alex", "lastName": "Keener", "country": "USA", "postalCode": "90001" }, { "email": "emily@example.com", "phone": "8015550101", "firstName": "Emily", "lastName": "Wallace", "country": "USA", "postalCode": "90009" } ], "remove": [{ "email": "john@example.com", "phone": "8015550102", "firstName": "John", "lastName": "Doe", "country": "USA", "postalCode": "90002" }] }, "enablePartialFailure": true }, "context": { "ip": "14.5.67.21", "library": { "name": "http" } }, "timestamp": "2020-02-02T00:23:09.544Z"}Supported schema mapping
The following table details the mapping of the schema fields specified in the RudderStack dashboard and Google Adwords Remarketing Lists, along with the relevant guidelines:
| RudderStack schema field | Google Adwords Remarketing Lists field | Guidelines |
|---|---|---|
email | hashedEmail | Include a domain name for all the email addresses. Remove any spaces in between the addresses. |
phone | hashedPhone | Format the phone number using the E.164 format. Include the country code as well. |
firstName | hashedFirstName | Do not include any prefixes (e.g., Mrs.). |
lastName | hashedLastName | Do not include any suffixes (e.g., Sr.). |
country | countryCode | Use the ISO two-letter/three-letter country codes. Include the country code even if all your users belong to the same country. |
postalCode | postalCode | Both the US and international zip and postal codes are allowed. For the US, 5 digit codes followed by 4 digit extensions are also allowed. For the rest of the countries, do not include the postal code extensions. |
mobileId | mobileId | Only include the mobile device ID. No other data types are accepted. |
thirdPartyUserId | thirdPartyUserID | Do not include any numbers. Only a string is accepted. |
FAQs
Where can I find my Google Adwords customer ID?
To get the customer ID associated with your Google Ads account, click the Help option in your Google Ads dashboard. You will find the customer ID in the resulting pop-up, as shown:
Can I set up the Enhanced Conversions and Remarketing Lists destinations using the same Google Ads account?
Yes, you can. Both the integrations are the sub-features of Google Ads. Hence, you can use the same Google Ads account to configure both the destinations in RudderStack.
How do I create a Google Ads customer list?
To create a customer list in Google Ads, follow these steps:
- Open your Google Ads account.
- Go to Tools and settings.
- Under Shared Library, go to Audience Manager.
- Click the + button and select Customer list.
- In Segment name, assign a name to the list.
- From the dropdown, select the list type of data to upload.
- Upload the CSV containing the user data. You can also download the template and upload the data.
- Finally, click UPLOAD AND CREATE.
What are the account permissions required for this integration?
For the integration to be successful, make sure the customer account used for OAuth verification adheres to Google's Customer Match policy and has Standard or higher (Administrative) access level permissions. For more information on the access level permissions, refer to this Google Ads support page.
To set the access level, follow these steps:
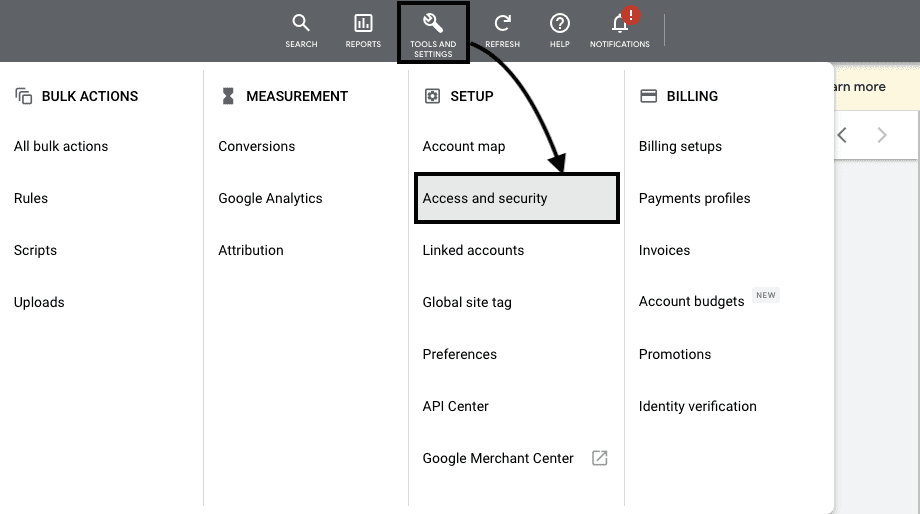
- Sign into to your Google Ads account and go to TOOLS AND SETTINGS > Access and security, as shown:
- Enter the email address of the account and from the list of permissions, select Standard or Administrative. Then, click SEND INVITATION, as shown:
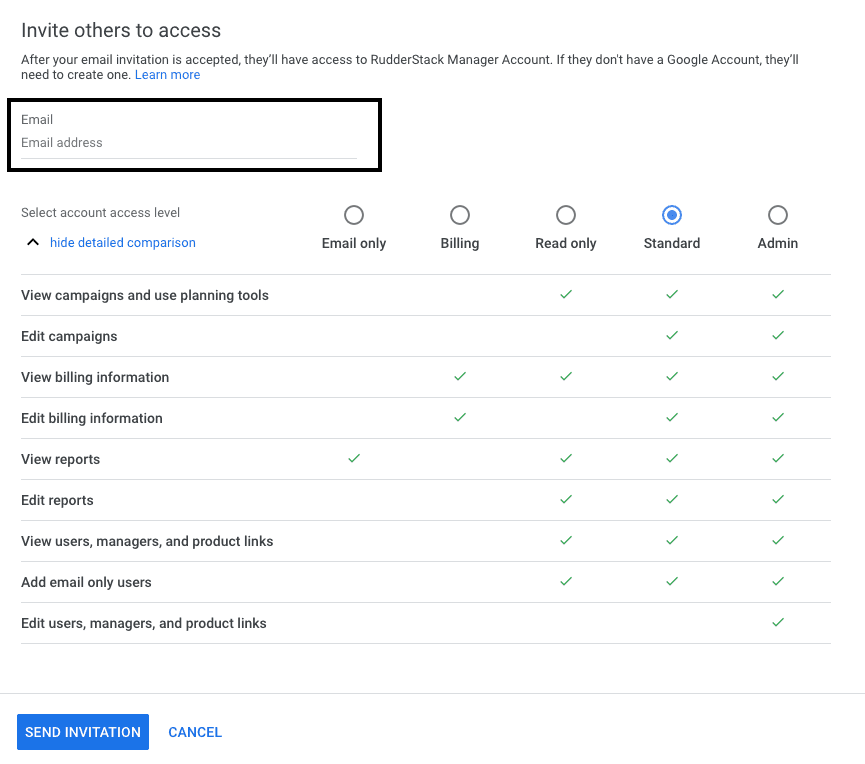
The account will have the access level permissions once they accept the invitation.
I am getting a 400 Bad Request error message. What should I do?
If you get a 400 Bad Request error while configuring the destination, make sure your customer account is allow-listed and configured to have Standard or Administrative access levels in Google Ads. Refer to the above FAQ for steps on setting the access level permissions for the account.
Contact us
For more information on the topics covered on this page, email us or start a conversation in our Slack community.